What is Screenshot?
A screenshot or screen capture is a snapshot taken with a computer, mobile phone, or tablet by the user of the device in question to capture the elements visible on the screen. A graphics file is used to save the image. Screenshots can be taken using a variety of applications or specific keyboard or button shortcuts.
An operating system or piece of software can produce screenshots. A screenshot can be taken and then saved as an image file (e.g., GIF or JPEG). Following saving, you can edit and print the image. The image is an illustration of a screenshot from the video game StarCraft.
How can I take a screenshot on a Windows computer or laptop?
Screenshots may be helpful at work, necessary for maintaining records or required by tech support to demonstrate a bug you’re encountering more clearly.
This straightforward task can be completed in Windows in several ways, all described below. And each of these techniques functions equally effectively on Windows 11 and Windows 10.
Method 1: The Snipping Tool
The Snipping Tool is the finest native alternative technique. This built-in screen capture tool performs its function adequately, although it is not the most powerful or adaptable tool for taking screenshots. However, it is a tool that enables users to specify and screenshot specific areas of their desktop display. Use it as follows.
Step 1:
Enter “snipping tool” into the taskbar’s search box to get started, then choose the resulting program. When it opens with Windows 10, you’ll notice a message stating that it will “move to a new home” in a future update. Not to worry. It’s still a tool in Windows 11, but Microsoft advises using
Step 2:
Click the Mode button once the Snipping Tool is open to reveal its menu. There are four ways to capture a screen: Draw a window (Free-Form Snip), box in a region (Rectangular Snip), take a screenshot of the current window (Window Snip), and take a screenshot of the whole screen (Full-Screen Snip).
The utility has a different look on Windows 11. When you launch the Snipping Tool, you’ll notice a new rectangular mode and no wait. These buttons function precisely as we previously explained. However, you must click the down arrow next to rectangle mode to access the window, full-screen mode, and free-form mode.
Step 3:
The screen goes white when you utilize the Free-Form and Rectangular Snip modes, so keep that in mind. The white tint disappears inside the screenshot space once you start defining it. While using the Window Snip feature, your screen turns white to copy a specific window’s contents, but not otherwise.
Step 4:
There is also a delay feature in the Snipping Tool. You can catch a certain point in a video or animation because it has a one- to five-second wait time before taking a stunning screenshot.
The Snipping Tool interface enlarges to reveal the screenshot you just took. Light adjustments can be made by deleting something with a pen or highlighter.
Step 5:
When you’re finished editing in the Snipping Tool, click File in the top-left corner and select the appropriate choice from the drop-down box by selecting Save As.
Method 2: Snip & Sketch
Microsoft’s updated version of its snipping tool is called Snip & Sketch. You can access this utility by pressing Win + Shift + S on your keyboard or selecting it from the Start menu. Use it as follows.
Step 1:
A five-button toolbar appears at the uppermost part of the screen, and the screen darkens if you execute the keyboard shortcut. The Snipping Tool doesn’t save screenshots as a file but still has the same features. Instead, the picture is immediately copied to your clipboard.
Step 2:
Additionally, a desktop message will show you that the image has been copied to the clipboard. Using the same notification, you can alter the taken image using the Snip & Sketch app. By selecting the Desktop Notification itself, you can choose this later. When you click the notification, the snapshot opens in the app, where you may crop it and add an eraser, pencil, pen, and highlighter.
Step 3:
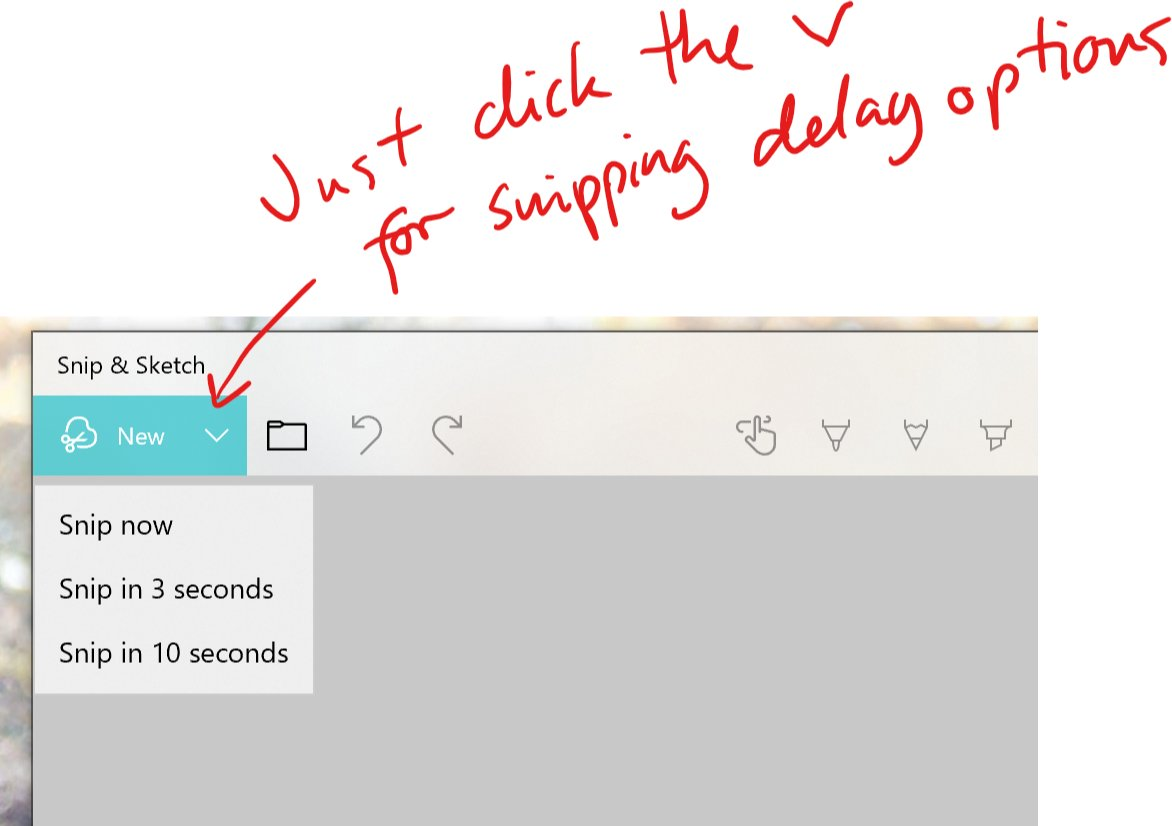
Instead of loading the Snip & Sketch program, pick Snip Now by clicking the drop-down arrow next to the New button in the top-left corner. The five-button toolbar appears as the screen becomes darker. As soon as you take your snip, the Snip & Sketch app should open and display the desired image for editing.
Step 4:
When you’re done, use the Disk-Style option to store the image anyplace on your computer. Click the Three-Dot symbol on the toolbar and choose the Open With option from the drop-down menu if you wish to modify and save the screenshot using any installed image editor.
Method 3: Keyboard shortcuts (PrintScreen)
Using keyboard keys, Windows offers six ways to screenshot your desktop. The Windows (Win) key is required for the remaining three, while three are based on the Print Screen (PrtScn) key.
A dedicated PrtScn key can be found in the upper-right corner of external keyboards. Usually, the Win key is located between the Control (Ctrl) and Alternate (Alt) keys in the lower-left corner of the keyboard. It is difficult to miss because it bears the Windows logo.
On a single key on laptops, the Print Screen command may be paired with another operation. The Function (Fn) key must be used in addition to the Print Screen key in this scenario.
The six commands for screen capture are broken down as follows:
Print Screen (PrtScn): Takes a screenshot of the whole screen. You can use this feature to capture everything displayed on all displays connected as a single image if you have many monitors. By default, this technique only copies the taken image to the Windows clipboard rather than saving it as a file.
Alt + Print Screen:
Catches just one window. Before tapping these two keys, highlight the target window first (or three on particular laptops), such as a document or browser. By default, this technique copies the image from the capture window to the clipboard rather than saving it as a file.
Win + Print Screen:
It catches the entire display. The distinction is that, in this case, Windows stores the image as a file. Your computer automatically sends it to C: UsersPictures>Screenshots or C: UsersOneDrive>Pictures>Screenshots.
Win + Shift + S:
Use the Snip & Sketch built-in screenshot tool to take a screenshot. Four options (excluding the Exit symbol) are presented on a small toolbar when the screen dims: Rectangular Snip, Freeform Snip, Window Snip, and Fullscreen Snip. This program only sends screenshots to the clipboard; it does not preserve them as images. Later on in this guide, we go into further detail.
Win + G:
The Xbox Game Bar is opened. This program will save a picture to C: when you click the Capture button and then the Camera icon. By default, go to Users>(user name)>Videos>Captures.
Win + Alt + Print Screen:
Merely the active window is captured. A picture is saved to C: using this command. By default, go to Users>(user name)>Videos>Captures.
Sometimes the screen dims or flickers to indicate that Windows has taken a screenshot. If this doesn’t happen, check the default places in File Explorer to see if Windows saved your image.
Method 4: Using OneDrive
You can store screenshots in the cloud using OneDrive so that they are accessible from any device. However, screenshots are not stored by default. You must click the Cloud symbol, which is adjacent to the System Clock, instead (or in the Hidden Icons menu marked with an upward-facing arrow).
You might need to open the OneDrive app and log in to your account if this symbol doesn’t display. Select Help & Settings from the pop-up menu after clicking the Cloud symbol, then click Settings. Then, in the next pop-up window, choose the Backup tab and select the Screenshots checkbox. Then press OK.
In this situation, pressing the first two Print Screen commands will cause an image file to be instantly saved to OneDrive. Instead of the screen flickering or dimming in response to these actions, you’ll get a notification. If you wish to access the photographs on your PC, sync the Screenshots folder.
You could find and view the screenshot using the Photos app if you saved it locally as a file using one of the available methods. You can relocate it, include it in an email, transfer it to the cloud, and do other actions if everything seems perfect. However, three native tools are available if you need to crop an image, particularly those captured on PCs with more than one screen: Paint, Paint 3D, and Photos.
You can paste your chosen image into any of these programs, crop it, and then save it in a different file format.
How to Take a Screenshot on Android
On an Android phone, taking a screenshot only requires pressing two buttons.
Your Android phone will decide which of the two buttons is which. Generally speaking, there are two simple ways to screenshot an Android device.
The first relates to the Samsung Galaxy S7 and previous Galaxy phone models. The second applies to other Android phones, including the Samsung Galaxy 8 and later iterations, and designs by Google, HP, LG, and other manufacturers.
Let’s begin by capturing a screenshot of the Samsung Galaxy S7.
1. How to Take a Screenshot on a Samsung Galaxy: Galaxy S7 and Previous Versions
Samsung keeps releasing new iterations of the Galaxy smartphone quickly. Many of us aren’t able to keep up with each release.
Or, even if your phone is more recent, you might drop it by accident on a bitterly cold Chicago day, causing the screen to turn inky purple or black and permanently damaging your device.
This was me a few months ago when I was the ecstatic owner of my husband’s previous Samsung Galaxy Note 5. You guessed it.
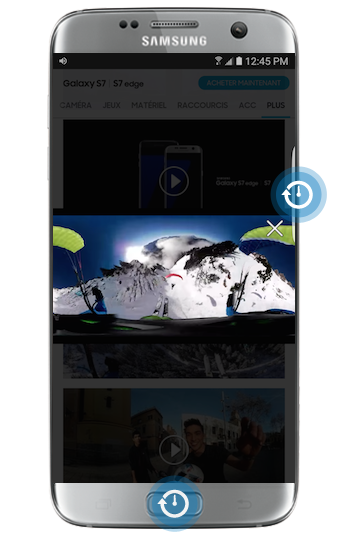
Take a screenshot by pressing and holding down the Home and Power Buttons if, like me, you have a Samsung Galaxy S7 or an earlier model—both of which are still excellent choices for all your smartphone needs.
Screenshot of the Samsung Galaxy S7
How to take a screenshot on an Android 2. (Including Samsung Galaxy S8 & later)
- Most Android phones (especially those produced in the previous few years) allow you to snap a screenshot by pressing and holding down the Power and Volume Down keys.
- On later Samsung Galaxy models, starting with the S8, this is also how you create a screenshot.
- Google-Nexus-screenshot
- If the sound is on, you’ll hear the sound of a camera shutter and a brief edge-to-edge screen flash. Even if it appears to vanish into thin air, this proves you took a screenshot.
- You can locate your screenshot in the phone’s gallery app, so don’t worry.
- On many Android phones, you may edit and share your screenshot after you’ve taken it.
- The power and Volume down keys are positioned differently depending on your phone.
- Click the link below for more details on how to screenshot on Android, including information on the top six Android phones, free screenshot applications, and locations of the relevant buttons on various models.
How to Take a Screenshot on an iPhone?
As with Android phones, taking screenshots on an iPhone only requires pressing two buttons.
The keys you press to capture your screen will also differ depending on whatever phone you have, much like the Samsung Galaxy.
1. iPhone 8 and previous screenshot methods
Up until the iPhone 8, simultaneously press and hold down the Power and Home keys to take a screenshot of a previous model of the iPhone.
This picture will be helpful if you’re new to iPhones. The home button on your iPhone is the circle at the bottom, and the arrow pointing to it is to the right.
iphone-8-screenshot
A little flash on your screen indicates a screenshot has been taken. You can also hear the sound of a camera shutter if your phone’s Volume is turned up.
You can find your screenshot saved to your camera roll or in the All Photos album if your phone runs iOS 10 or an earlier version. You can discover the image in your iPhone’s camera app’s screenshots album if your device is running iOS 11.
2. How to Take a Screenshot on an iPhone X
If you have a beautiful new iPhone X, you’ll notice that the Home button is missing from the front of your device.
On your iPhone X, press and hold down both the Volume Up button (located on the left) and the Side button (the big button on the right side) simultaneously to snap a screenshot.
iphone-x-screenshot
If your Volume is turned up, taking a screenshot on an iPhone X will, like taking one on an iPhone 8, result in a brief white flash and the sound of a camera shutter.
In the bottom-left corner of your phone’s screen, a thumbnail of the screenshot will then show up. Please tap on the picture to update your screenshot or decide where it will be saved.
How to screenshot on a Samsung tablet?
If you own an Android phone like a Samsung Galaxy 8 or later, taking a screenshot on a Samsung Galaxy tablet will be extremely familiar to you!
Squeeze the Power and Volume Down keys simultaneously to take a screenshot. Your screen’s edges will briefly flash with a white border.
Your tablet will save the screenshot to the gallery and copy it to the clipboard for you to quickly paste into a message or document.
If your Samsung tablet doesn’t have a physical Home key, use the volume button. Instead, while hitting the Power and Home keys simultaneously, keep them both depressed.
How to screenshot a Windows tablet?
On a Windows tablet, taking a screenshot is similar to doing so on an Android phone.
Here are three sets of guidelines for taking screenshots on Windows tablets, with the exception of the Surface Pro 4, Surface Book, and Surface 3.
1. How do I screenshot a Microsoft Surface 3 tablet?
When you want to capture a screenshot of your Surface 3 tablet, squeeze and grasp the Volume Down button and the Windows logo simultaneously.
The Windows logo can be found front and center on your device.
As the picture is taken, the screen will dim. Then, under “This PC,” you can find your screenshot in the photos library’s screenshots folder.
2. How do I screenshot a Surface Pro 3 or Surface Book from Microsoft?
By keeping the Power and Volume Down buttons simultaneously on a Surface Book or Surface Pro 4, you can capture a screenshot in place of the Windows logo.
Once more, the screenshots folder in your picture library is where you may discover the images.
3. Additional ways to screenshot a Windows 10 tablet?
You will have access to the same extra screenshot features seen on a Windows computer for a tablet running Windows 10.
With the Snipping Tool, you can snap a screenshot just as on your Windows laptop. This will allow you to name the File and capture a piece of your tablet’s screen.
You may screenshot your display by tapping and holding down the Windows icon and the Print Screen key on your Windows 10 Microsoft tablet’s keyboard.
The Print Screen button is frequently identified by the letters PrtSc.
These screenshots are located in the photos library on your tablet’s screenshots folder.


